Fitness Tips
Mobility and Stability Drills You Should Be Doing Now
Don’t be so focused on your cardiovascular and muscular capacity that you’re neglecting your mobility and stability! You will find that the more mobile and stable your core muscles are, the more powerful your moves in the weightlifting department. So, if you’re not doing these mobility and stability drills now, then you should start as soon as you finish reading this article.
Plank and Side Plank
Let’s face it – not everybody loves the plank because it just seems like a passing fad. But it isn’t, far from it, because the plank and its variations are great exercise for your hips!
Keep in mind that the hips are the stabilizers in most, if not all, of your cardiovascular and strength training exercises. Your hips should have relatively free movements within their sockets, especially during flexion, extension, and rotation. Your balance during lifting, pulling and pushing movements will also partly depend on the strength and stability of your hips.
Indeed, your overall performance when walking, running, lifting, jumping, and squatting, among others, will be influenced by your hips’ overall range of movement. But your core muscles should also be stable or else your other muscles will work to compensate for the loss of stability.
The result of the compensation: Your hips move less efficiently within its socket and, thus, decreases its mobility. Your risks for pain and injury increase, too.
But when you perform planks and side planks properly and regularly, you can reduce these risks. This is because planks activate the core muscles resulting in better movements in the hips.
Keep the following plank techniques in mind when you’re starting out:
- Place your hands directly beneath your shoulders. You may also position them in line with your shoulders, either shoulder-width or wider than shoulder-width apart.
- Assume the top position in a push-up. Keep your toes planted and your back as flat as possible. Your head and spine should be in a neutral position.
- Hold the position for at least 30 seconds. You may be unable to do it for the 30 seconds for the first time so you can start with 15 seconds. You should then gradually build up your strength until you reach the goal of 2 minutes, max.
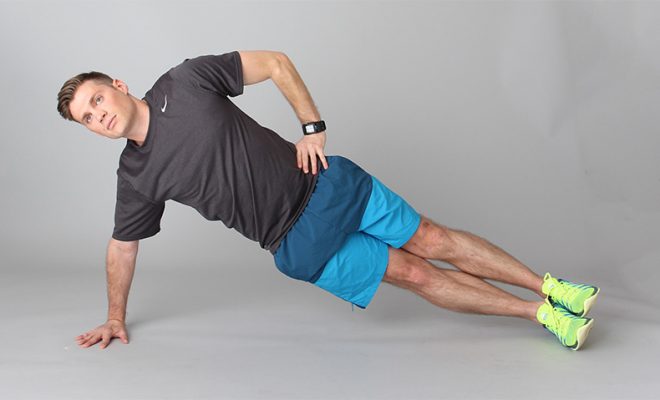
In case of the side plank, the techniques are as follows:
- Lie on one side. Your top leg should be staggered in front of your bottom leg while your upper body should be proper up by one of your elbows.
- Stretch out your hand so that it lifts toward the ceiling.
- Slowly lift your hips off the ground. At its topmost point, only your elbow and feet should be touching the floor.
- Look up at your outstretched hand.
- Hold your position for 20 seconds, max.
- Switch sides and repeat the steps.
In time, you should be able to hold the side plank position for 75 seconds on each side. Your core muscles will be stronger by then so the 75 seconds will not seem like an eternity on your body.
Bear Crawl
Contrary to its name, you will not crawling back home from Anytime Fitness with a body wracked by pain after performing the bear crawl. In fact, this is a great exercise for virtually all types of people, whether as fit as fiddle or recovering from a back injury.
The bear crawl activates the core muscles in a dynamic manner, in contrast with the plank and side plank’s hold. Your spine must be mobile in order to perform the movement, too. You will then enjoy the benefits of stability and mobility, which can be translated to your cardio and strength training exercises.
You have to say goodbye to your inhibitions since you will be crawling, literally, with the bear crawl. The techniques are as follows:
- Get on your hands and knees on the floor.
- Lift your knees only by an inch off the ground when performing the crawl. Keeping your knees as close to the ground as possible will work your core muscles.
- Move your opposite hand and leg forward – left hand and right leg, for example.
- Continue crawling in this way. Keep your hips as stable as possible while your steps should be small.
- Set a target area, crawl to it, and turn back to your starting place. You should aim for 20 yards one way so a set will mean crawling for 40 yards.
Don’t underestimate the bear crawl although it seems like even a baby can do it. Once you’re on your hands and knees, you will find that it is harder than it looks. But the benefits are aplenty so stick with it.
You should incorporate these stability and mobility moves into your exercise routines, such as after your warm-up or before your cool-down. You may find bear crawling just a tad silly but the rewards are serious.
0 comments